You will learn how to prepare stylish homemade sushi in ten clear steps; fresh fish requires caution, correct rice is crucial, and with practice you will achieve amazing results . More details: How to make sushi (even if you’re not a jiro)
Key Takeaways:
- Perfect sushi rice: wash rice thoroughly, cook properly and season with sushi vinegar; Temperature and stickiness are crucial.
- Fresh ingredients & safety: Only use high-quality ingredients suitable for sushi (fish, vegetables) and pay attention to hygiene and refrigeration.
- Technique & Presentation: Master nori, bamboo mat and cutting technique; appealing rolling, cutting and serving makes homemade sushi stylish.

Cooking high-quality sushi rice
For stylish sushi, you need high-quality short-grain rice. Weigh accurately, rinse thoroughly and make sure to have a rice-water ratio of about 1:1.1-1.2 depending on the variety; Soaking for 30 minutes improves the texture. Season with rice vinegar, sugar and salt after cooking and cool quickly. Important: Leaving it standing at room temperature for a longer period of time promotes bacterial growth.
Wash short-grain rice thoroughly
You should wash the rice 3-4 times until the water runs clear. Use cold water and stir gently, not rubbing the grains too hard. This will remove excess starch for fluffy, shiny grains. Unwashed rice becomes too sticky and makes it difficult to roll.
Cook with pinpoint accuracy in the pot
Bring the rice to a boil briefly, then immediately reduce the heat to the lowest flame and let it steep for 12-15 minutes with the lid closed; then rest for 10 minutes. Do not lift the lid during cooking, otherwise steam will escape and the grains will cook unevenly.
Use a heavy pot with a tight-fitting lid and soak the rice for 20-30 minutes beforehand. Older rice needs a little more water. Do a press test: tender on the outside, slightly firm to the bite on the inside. Avoid too high a heat so that nothing burns; slow pulling is safer.
Making the perfect seasoning blend
You prepare the seasoning mixture in such a way that it gives the rice an even shine, acidity and sweetness . Make sure you have a balance and taste the mixture warm, because cold flavors will distort the judgment. Don’t underestimate seasoning – a mixture that is too acidic or salty will ruin even perfectly cooked rice.
Prepare everything before you have the rice ready so that you can incorporate the marinade immediately and evenly.
Mix rice vinegar, sugar, salt
For about 300-400 g of cooked rice, mix about 3 tablespoons of rice vinegar, 1-2 tablespoons of sugar and 1 teaspoon of salt. Heat the mixture slightly until the sugar and salt are completely dissolved; do not boil, otherwise the fine acidity of the vinegar will evaporate.
Let the seasoning become lukewarm before adding it to the rice. Taste like: too much salt is dangerous for the overall taste, better to add gradually.
Carefully incorporate the marinade
Pour the marinade over the warm rice and work it in with a wooden spatula by cutting and folding it. You should treat the rice gently so that the grains retain their structure and do not become mushy.
Fan the rice as you flip it so that it cools quickly and shiny; fast working ensures uniform taste and the typical consistency.
Other important notes: Work in small portions, maintain hygiene with raw ingredients and serve the rice fresh. Caution: Store raw fish in a strictly cool place, otherwise you can achieve a perfectly seasoned, shiny sushi rice result with this technique.
Selecting first-class fish
When making sushi yourself, you decide on the quality. Choose only fish with sashimi/sushi quality, clear color, firm texture, and no fishy smell.
Buy from trusted dealers and ask for catch or slaughter time. To be on the safe side: frozen (−20°C, 24h) reduces the risk of parasites; avoid unclear origin.
Pay attention to absolute freshness
Check eyes, gills and flesh: clear eyes, bright red gills and firm flesh are signs of freshness. If something is slimy or smelling strong, don’t use it.
Pay attention to the storage temperature 0-4°C at the dealer and buy as soon as possible before preparation. Freshness directly influences taste and safety.
Precise cutting against fiber
Always cut against the grain to keep the slices tender and juicy. Keep the knife flat and make steady, even cuts.
Use a sharp sashimi knife and wipe the blade between cuts; the cut determines the look and mouthfeel.
For nigiri, cut slices of about 1-1.5 cm, for maki thinner. Work with a damp cloth, place the blade at a 45° angle , and cut in one go.
Preparing fresh vegetables
You wash and dry your vegetables thoroughly, because cleanliness is crucial for taste and safety. Make sure that everything stays crisp and fresh by cutting it just before rolling it and placing it on a clean cloth.
Cut evenly for even rolling and biting; even cuts ensure good texture. Avoid cross-contamination with raw fish or meat by using separate cutting boards and knives.
Donate avocado and cucumber
Cut the avocado in half, remove the pit and poke out half with a spoon; cut them into even sticks. Use only ripe but firm avocados to prevent the sticks from falling apart, and be careful with the knife.
For the cucumber, optionally remove the skin, remove the seeds and cut it into fine sticks. A crunchy cucumber gives freshness and structure – remove the watery seeds so that the roll does not become too moist.
Prepare ingredients decoratively
Place color-coordinated vegetables, nori, and rice on a board or tray; appealing colors make your sushi more appetizing. Use small bowls for soy sauce, wasabi and ginger and don’t overfill – not overfilling keeps order.
Keep perishable ingredients in the fridge until just before serving to keep everything cool and fresh. Make sure your workspace is clean so that your presentation looks hygienic and elegant.
For fine details, use small pliers or tweezers to precisely place herbs and microgreens; this creates a professional result. Pickle ginger and thinly sliced radishes add contrast and texture – fine tools make all the difference.
How to place nori seaweed sheets correctly
Place the nori sheet on the bamboo mat so that you can roll comfortably later; make sure your hands are clean, dry and have a flat surface. Place the sheet so that the side comes into contact with the rice and you leave a free closure at the back edge.
Rough side to top
If you place the rice side directly on top of the nori, place the rough side up so that the rice adheres better. With inside-out rolls (uramaki), however, you work the other way around: there the rough side is inside.
Leave edge blank for closure
Leave about 1-2 cm free at the back edge so that you can close the sheet cleanly; without a rim , there is a risk that the roll will open during cutting. Be careful not to wet the edge too much, or the nori will tear.
Moisten the free edge only lightly with a few drops of water or a little rice starch, press firmly and evenly while rolling; this ensures a tight, smooth seal and prevents the filling from spilling out.
Precisely shape the maki roll
Place the nori sheet on the bamboo mat, spread the rice thinly and evenly and place the filling in a line near the bottom edge. Be careful not to use too much rice or stuffing so that the roll remains stable while rolling.
When shaping, apply even pressure and roll slowly so that the nori is smooth. Avoid pressing too hard, as too much compression will destroy texture and visuals; gentle, constant pressure results in clean, stylish wheels.
Roll bamboo mat evenly
You tighten the mat, roll it with your fingertips and hold the filling in place. Wrap the mat halfway around at first to check the position, then pull evenly so that the roll is evenly shaped .
Place cling film over the mat in advance so that the rice does not stick, and work in calm, even strokes. Continuity in rolling ensures a compact, round shape without wrinkles.
Create a compact shape
You create compactness through controlled, even pressure along the roller; start loosely and gradually increase the pressure without crushing the nori. Tuck in the ends with your fingers to prevent the filling from leaking.
Lightly moisten the free nori edge with water before sealing the roll so that it adheres securely. If necessary, use a clean cut and a sharp knife to achieve clean edges .
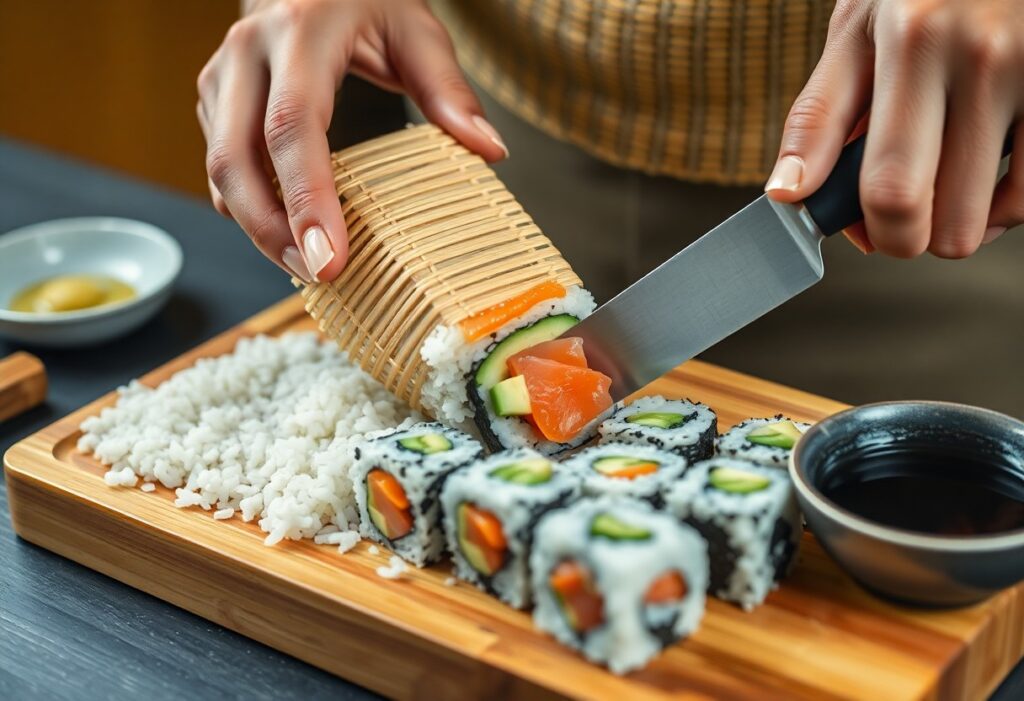
Let the finished roll rest in the fridge for a short time (10-15 minutes) before cutting so that it sets; this increases the quality of the cut. Always pay attention to the cold chain for raw ingredients, because improper storage can be dangerous to health . A sharp, damp knife will then make it easier for you to make precise slices.
Cutting rolls professionally
When cutting, make sure you have a sharp blade, a non-slip surface and steady hands. Place the roll stably so that it doesn’t slip, and avoid too much pressure that destroys the mold.
Cut even spacing (about 2 cm) and wipe the blade briefly between cuts so that you get clean, even slices .
Moisten the blade with vinegar water
Lightly wet the blade with vinegar water before each cut; this prevents sticking and has a slightly disinfecting effect. Dip the blade only briefly or dampen a cloth with it.
Avoid too much liquid or the rice will be mushy – less is better here.
Perform pressureless, pulling incisions
Make each cut as a pulling motion: place the blade at the top and gently pull it through the roll without pressing down. A jerk-free, pulling cut preserves shape and filling.
Hold the roll slightly fixed with your other hand, but don’t apply strong counterpressure, or you’ll squeeze the sushi pieces together.
For best results, first cut the roll in the middle and then cut each half into even pieces; wipe the blade in between and work with a 45° angle and a single, pulling motion so that the pieces stay clean and nothing leaks.
Create Artful Nigiri Sushi
You form nigiri by tempering the rice properly and applying gentle pressure . Pay attention to hygiene and fresh fish, as this is crucial for taste and safety. For a recipe reference, see Homemade Sushi Recipe – How to Make Sushi at Home.
Shape small portions of rice by hand
Slightly moisten your hands and take about 15-20 g of rice. Use your thumb and middle finger to gently press into a compact, but not too firm, shape so that the nigiri stays loose and the fish sticks. Don’t press too hard or the texture will be destroyed.
Placing toppings elegantly
Cut the fish thinly and wipe off any excess moisture. Place the topping diagonally on the rice oval and smooth it with light pressure; Less is more for taste and appearance. Use a small amount of wasabi between the rice and fish for balance.
For delicate toppings such as octopus or seafood, make sure they are stored in a cool place and have fresh quality. Work with tweezers for precise placement and keep the surface free of excess liquids for clean, stylish nigiri.
Create an aesthetic presentation
You design sushi in such a way that it immediately catches the eye: pay attention to rhythmic arrangement, clean edges and enough negative space for each piece to work. Avoid overloading; less is more, so texture and color dominate.
Choose plates and accessories wisely: matte, neutral tops highlight pops of colour, while glossy surfaces create reflections. Pay attention to freshness – spoiled ingredients jeopardize taste and safety.
Choose contrasting colors
You combine bright salmon red, deep tuna blue, green avocado and yellow mango to create strong visual contrast. Such combinations increase the perception of freshness and make the dish more inviting.
Set colors specifically as accents instead of using many different ones at the same time. Important: Only use fresh, safe ingredients, because visually strong but unsafe products reduce enjoyment and can be hazardous to health.
Minimalist arrangement on tableware
You place a few, perfectly shaped pieces per plate and leave space between them so that the shape of each sushi works. Choose plates with simple lines; this does not distract from the content and conveys elegance.
Work with odd quantities, small sauce dots and herb accents to achieve balance. Avoid too many textures at the same time, otherwise there will be restlessness on the plate.
Use tweezers and a damp cloth to keep edges clean; clean presentation looks professional. Neutral background and subtle garnish make colours shine and emphasise the quality of your ingredients.
Make your own sushi – 10 ingenious steps for stylish homemade sushi
You will learn the right choice of ingredients, how to cook and season perfect sushi rice, how to treat nori correctly, how to use different rolling techniques (maki, uramaki), how to cut precisely, how to choose creative fillings and sauces, and how to ensure hygiene and attractive presentation.
If you follow these ten steps consistently, you will achieve reproducibly clean rolls, balanced flavors and elegant presentation – making your homemade sushi professional and stylish.
FAQ
Q: What ingredients and tools do I need to make sushi at home in style?
A: Basic ingredients: high-quality round-grain sushi rice (shari), rice vinegar, sugar, salt, nori sheets, fresh sushi-quality fish (e.g. salmon, tuna) or cooked/vegetarian alternatives (cucumber, avocado, tempura prawns). In addition, soy sauce, wasabi and pickled ginger. Tools: rice cooker or heavy pot, large shallow container or hangiri to cool, rice spoon (shamoji), bamboo mat (makisu) with cling film, very sharp knife, damp cloth, cutting board and if necessary sushi grater or small bowl for mixing the vinegar.
Q: How do you make the perfect sushi rice (steps and tricks)?
A: Wash rice thoroughly until the water runs clear; Soak for 30 minutes (depending on the variety). Cook in a rice cooker with the appropriate amount of water, let it rest for 10-15 minutes. Heat rice vinegar with sugar and salt until dissolved. Put the hot rice in a shallow container, add the vinegar mixture and fold in with cutting movements (do not stir), cooling the rice with a fan or fan until it is lukewarm. Goal: sticky, shiny graininess, not mushy or too dry. Moisten hands with vinegar water before shaping.
Q: How do I cook raw fish safely and what precautions are important?
A: Buy fish as “sushi or sashimi quality” from trusted retailers. Strictly adhere to the cold chain (<4 °C). To reduce parasites, it is recommended in many regions to freeze fish at a temperature of at least −20 °C for 24 hours (or according to local regulations) before use; observe applicable food laws. Use clean, separate cutting boards and knives, cut into thin, even slices against the grain, and work briskly. For risk groups (pregnant women, immunosuppressed women, small children), avoid raw variants and resort to cooked alternatives.
Q: What are the techniques for maki, uramaki (inside-out) and nigiri, and what do I need to pay attention to?
A: Maki: Nori glossy side on the outside, apply a thin layer of rice, leave a border at the top, place the filling in the middle, roll and shape tightly with bamboo mat, cut with a moistened, very sharp knife. Uramaki: Cover the mat with cling film, place the rice on top of the foil, place the nori on top of the rice, fill the nori, turn the roll, sprinkle the outer surface with sesame seeds or roe if necessary. Nigiri: form small oval rice balls with slightly damp hands, place a small layer of wasabi on rice or fish, place the fish at an angle and press down lightly. Clean and moisten knives between cuts so that rice does not stick.
Q: How do I store ready-made sushi, how long does it last, and how do I prepare it for guests?
A: Ready-made sushi should ideally be served fresh; Do not leave at room temperature for more than 2 hours. Store in the refrigerator in a flat, airtight box for a maximum of 24 hours (loss of quality of rice and raw fish possible). Consume raw fish sushi on the same day if possible. For guests: prepare the rice and ingredients in advance, but roll/assemble just before serving; Have cold plates and small bowls with soy sauce, wasabi and pickled ginger ready. Label raw variants and offer cooked/vegetarian alternatives for sensitive guests.