You will learn how to prepare sushi safely in ten clear, sure-to-succeed steps: from cleanliness and rice preparation to the correct handling of raw fish, so that taste and safety are always right.
Key findings:
- Perfect sushi rice is crucial: use the right rice, cook it exactly and season it to perfection with rice vinegar, sugar and salt.
- Fresh ingredients and sharp tools ensure flavor and clean cuts – when it comes to raw fish, be sure to pay attention to sushi quality and cold chain.
- Technique, cleanliness and practice ensure success: wet hands, even rolling, hygienic processing and correct storage.
Wash the rice thoroughly
For sushi, you need to wash the rice thoroughly until the superficial starch is removed. This prevents the rice from sticking together during cooking and gives you a shiny, grainy result.
Rinse out the starch completely
Rinse the rice in a bowl of cold water and rub it gently with your hands until the water becomes cloudy; repeat the rinse several times (3-5 times) until it is much clearer. Be careful not to rub too aggressively so that the grains don’t break.
Water must become clear
The goal is for the water to remain completely clear – a sign that the superficial starch has been removed. If the water is still cloudy after several rinses, continue rinsing; starchy water leads to sticky rice.
As a rule of thumb, 4-6 rinse cycles with cold water are usually sufficient; turn the bowl slightly and let the water drain completely. Clear vision also means better adhesion of the spice vinegar and a looser bed of rice.
Cooking rice to perfection
For your sushi to succeed, you need to rinse the rice thoroughly until the water runs clear and pay attention to the right ratio and resting times. Use a saucepan with a tight-fitting lid or a rice cooker and avoid stirring too much so that the rice remains fluffy and sticky at the same time.
Maintain the correct water-to-rice ratio
Use a uniform measuring vessel and keep a ratio of about 1:1 to 1:1.1 (rice:water ). Too much water makes the rice mushy, too little leaves it hard and uneaten.
Let it soak for a sufficiently long time
Soak the rice for about 20-30 minutes before cooking so that the grains absorb water evenly. Soaking prevents uneven cooking and provides a better texture.
After cooking, be sure to let the rice rest covered for 10-15 minutes so that the residual heat gently finishes cooking the grains; do not open the lid beforehand, otherwise the necessary moisture will escape.
Prepare the vinegar mixture
Prepare the vinegar mixture while the rice is cooking: mix rice vinegar, sugar and salt in the ratio you prefer, possibly some mirin. Heat the mixture only slightly until sugar dissolves. The result is shiny, flavorful sushi rice.
Dissolve salt and sugar
Add sugar and salt to the lukewarm vinegar and stir until completely dissolved. Do not boil, otherwise the taste will change. Taste briefly and adjust so that the mixture is neither too sweet nor too sour.
Carefully fold into rice
Spread the vinegar mixture evenly over the hot rice and fold it in with a wooden spatula in cutting, folding motions. Be gentle so that the grains are not crushed. Pay attention to the hot steam to avoid burns.
Fan the rice as you fold it in so that it quickly sinks to hand warmth; this preserves texture and shine. Work quickly but carefully, the rice should be served warm, not hot. Never squeeze it, or it will become sticky and mushy.
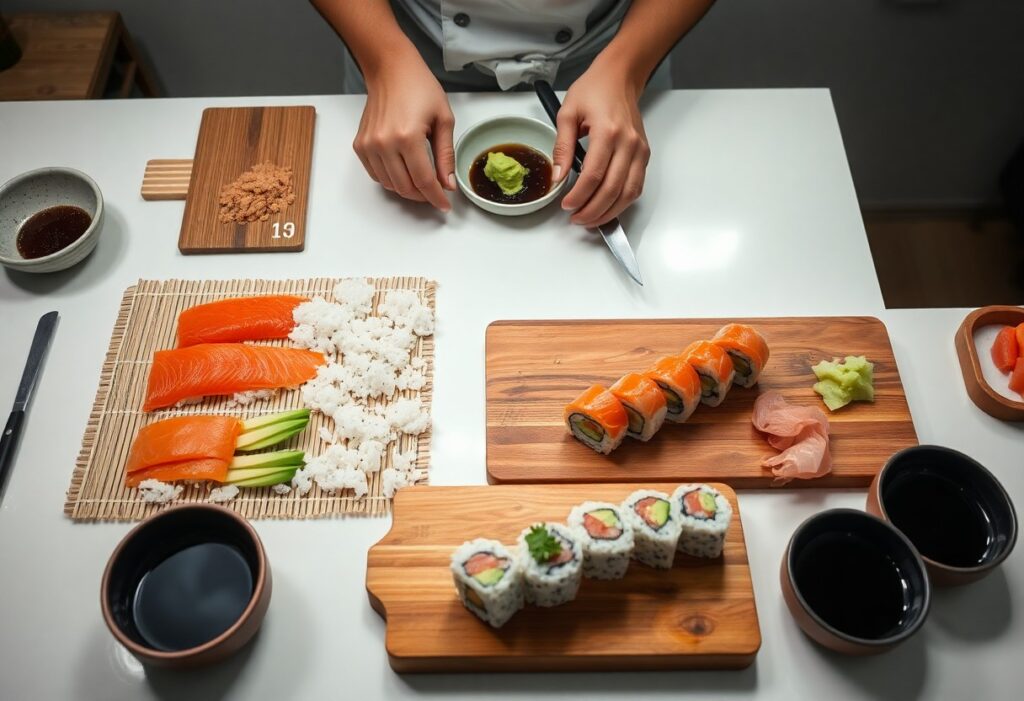
Cutting ingredients with precision
When cutting, it’s all about calm and precision: keep a sharp knife, a safe cutting surface and clean hands. Make sure the ingredients are fresh and avoid cross-contamination. You can find more information about shopping here: Make your own sushi – ingredients for authentic sushi.
Divide fish into strips
Cool the fish well and only work with sashimi quality. Cut with long, even strokes against the grain, about 3-5 mm thick. Be aware of the danger of parasites in raw fish: If unsure, treat frozen or choose store-bought, tested fish.
Finely chop vegetables
Cut cucumber, carrot or radish into even planks, then into fine sticks. Use a sharp knife or mandolin and fix the vegetables to avoid slipping . The aim is to achieve uniform width for clean rolls and visually appealing bites.
For less water in the roll: Remove the seeds from the cucumbers, salt the sticks briefly and dab them off. For hard vegetables, blanch the sticks lightly beforehand so that you cut them thinly and evenly.
How to place the nori sheet correctly
Place the nori sheet on the mat with the rough side facing up and the shiny side facing down . Make sure to leave a small border free so you can close the roll later. Avoid hands that are too wet or too much rice so that the leaf doesn’t tear or become mushy.
Rough side to top
The rough side ensures that the rice adheres better and the roll remains stable. If you place the leaf upside down, the rice will slip and the roll will become loose or break. Check the surface before covering – you can recognize the rough side by the matte, slightly fibrous structure.
Place on the bamboo mat
Place the nori sheet in the middle of the bamboo mat with the rough side up and the open edge facing you. Align the sheet so that the mat protrudes slightly; this makes rolling easier and ensures even pressure.
When rolling, press evenly and gently with wet fingers so that the leaf does not tear. Roll tight enough for a compact shape, but not too tight – too much pressure can squeeze out filling or deform the mat.
Distribute rice evenly
You spread the rice evenly on the nori, starting in the middle and outwards. Be careful not to apply too thick a layer so that the roll does not burst open later.
Work briskly and press the rice only lightly with a damp tool: firm but loose so that texture and flavor are preserved.
Moisten fingers with water
Have a bowl of water ready and wet your fingers before forming the rice. This way , the rice doesn’t stick to your fingers and stays evenly distributed.
Use only a little water; too much will make the rice mushy and affect the consistency of the roll.
Leave the top edge blank
You leave about 1-2 cm of edge on top of the nori: this is important for sealing the roll. Without a free edge, the roll can come apart when rolled up.
The free edge prevents rice from slipping into the seam; make sure it has a clean, dry edge for a secure seal.
Before you roll, moisten the free edge lightly with water or a little rice vinegar so that the nori end seals tightly and securely – but not too wet, otherwise the surface will come loose and the roll will soften.
Place the filling in the middle
Place the filling in the middle of the nori sheet, about 2 cm from the bottom edge, so that the roll closes neatly as it rolls. Make sure it is evenly distributed; skewed arrangement leads to uneven pieces. You can find more tips under Make your own sushi.
Arrange ingredients compactly
Place solid ingredients such as cucumber and avocado in a line, soft ingredients on top. A compact arrangement prevents air pockets and makes rolling easier. Press down lightly, but avoid mashing the rice.
Do not cover too lavishly
Specimens sparingly: a maximum of a thin layer of fish and a few strips of vegetables. Too much filling will lead to burst rolls and uneven pieces.
If you’re unsure, do a test track with less filling; this reduces waste and ensures stable, clean cuts.
Roll sushi tightly
Roll with the mat evenly and controlled, so that the filling is snug in the nori. Roll tightly ensures a compact structure without falling apart; however, be careful not to press too hard, otherwise rice or stuffing will spill out.
Check the seam side and press the mat briefly to seal the roll. If the roll seems loose, carefully loosen the mat and roll again until the shape is stable.
Lift the mat evenly
When lifting, lift the mat synchronously on both sides so that the roll is evenly shaped. Lifting evenly prevents the roll from tipping or the filling from slipping.
Use your fingertips, not the palm of your hand, and remove any excess rice from the edge of the mat so that nothing sticks. Be careful not to tilt the mat or create an uneven shape.
Shape with gentle pressure
After lifting the mat, apply gentle, even pressure to the roll with your fingers to thicken the rice and stuffing. Too hard pressure can damage the roller.
Feel with your hands if the roll is compact; avoid air pockets and uneven spots. If necessary, roll briefly until an even cylindrical shape is obtained.
If necessary, place cling film over the mat to prevent sticking, and twist the roll slightly as you press so that all sides are evenly shaped. Let the roll rest for a short time before cutting it so that the mold settles.
Make clean cuts
You work with a sharp knife and a steady hand so that the ingredients are not crushed. Be aware of the risk of slipping with wet rice and always keep your fingers safely outside the cutting line.
Clean cuts improve appearance and taste; practice the cutting technique and change the knife in time so that you get even, clean slices .
Always moisten knives
You moisten the blade with water or a damp cloth before each cut so that the rice and fish do not stick. Dip the knife briefly and wipe it off – this will avoid hook-like cracks and get clean edges.
Divide into even pieces
You divide the rolls and nigiri into equal pieces so that each bite is balanced. Mark the cut points beforehand and cut with even pressure to achieve even portions .
Use a slow sawing motion instead of pushing; this preserves shapes and reduces the risk of breakage.
For precise pieces, you can use a thread or ruler for orientation and press the pieces lightly beforehand so that you don’t slip when cutting.
Serve attractively
When serving, make sure that colors and shapes harmonize: roll nigiri and maki clean, place contrasting side dishes such as cucumber and avocado and keep fish well chilled. You can find more tips in Make your own sushi: instructions and info.
Add wasabi and ginger
Add spicy wasabi and pickled ginger separately so that everyone can dose. Ginger serves as a flavor cleanser, eat it between pieces; Use wasabi sparingly, as it can be very pungent and irritating .
Use high-quality soy sauce
Choose a high-quality, ideally naturally brewed soy sauce or tamari. Have small bowls ready and dip the fish, not the rice, briefly to keep the balance.
Prefer a low-sodium variant if you want to reduce salt; store opened bottles in a cool and dark place, so the aroma is retained longer.
Result
You now have clear steps to prepare sushi safely: clean hands and freshly chilled fish prevent risks. Observe proper rice and food hygiene to avoid food poisoning .
With practice and good ingredients, you will reliably achieve good results: regular tasting and refrigeration are positive for quality and safety. Stick to the steps, then you will surely succeed in making sushi.
FAQ
Q: What ingredients and tools do I need to make sushi successfully at home?
A: For sushi, you’ll need: sushi rice (Japanese short-grain rice), rice vinegar, sugar, salt, nori leaves, fresh sashimi-quality fish or substitute fillings (cucumber, avocado, cooked shrimp), soy sauce, wasabi, and pickled ginger. Tools: Rice cooker or pot with tight-fitting lid, wooden spoon or rice spatula, shallow wooden or plastic container to cool the rice (hangiri is ideal), bamboo mat (makisu), sharp filleting or santoku knife, kitchen towel and cling film.
Q: How do I prepare the sushi rice perfectly step by step?
A: Wash rice thoroughly until rinse water runs clear; Soak rice for 30 minutes; Rice:water ratio about 1:1.1-1.2 depending on the type of rice; bring to a boil in rice cooker or saucepan without a lid on high heat, then reduce heat and cook for 12-15 minutes; Let it rest for 10 minutes without a lid; Heat rice vinegar with sugar and salt until dissolved; place the hot rice in a wide bowl, drizzle in the vinegar mixture evenly and gently turn (cut and fan) with a wooden spatula until the rice is glossy and reaches room temperature; Do not refrigerate before rolling up.
Q: How do I roll Maki and Inside Out rolls cleanly and without cracking?
A: Place nori on the bamboo mat with the shiny side down, apply a thin, even layer of rice (about 70-90 g), leaving 1-2 cm free at the top; place the desired filling in the middle; with the help of the mat, roll up firmly, but not too strongly, and apply even pressure; moisten open edge with a little water to seal it; for inside-out, first spread rice on cling film on the mat, place nori on top, then turn over and place filling inside, then wrap around; cut sharp, damp knife in one go, wiping between cuts to obtain clean slices.
Q: What do I need to pay attention to when it comes to raw fish and hygiene so that sushi is safe?
A: Buy fish only in sashimi or sushi quality from trusted retailers; freeze high-fat fillets (e.g. salmon) ideally at −20 °C for at least 24 hours, if not previously declared sushi-qualified; work with clean hands, cleaned surfaces and separate cutting boards for fish and other ingredients; keep ingredients cool (4 °C) until processed; prepare only the amount that will be consumed within a few hours; Refrigerate leftovers within 24 hours and do not refreeze; in case of pregnancy, immunodeficiency or small children, avoid raw fish or choose cooked alternatives.
Q: What are the 10 sure steps for sure sushi results?
A: 1. Prepare and check ingredients and tools; 2. Wash rice correctly and soak for 30 minutes; 3. Cook rice with the right water ratio; 4. Dissolve the rice vinegar, sugar and salt and incorporate evenly; 5. Gently cut and fan the rice to room temperature; 6. Prepare nori and fillings fresh and of suitable size; 7. Protect bamboo mat with cling film and spread rice evenly; 8. Roll properly: even pressure, close free edge; 9. Use a sharp, damp knife and cut in one go; 10. Observe hygiene and storage: Refrigeration, sashimi quality, consume leftovers quickly.